One of the interesting things about knowing how to work on Photoshop 2023 is that it helps you to discover your creative sides. And that also includes getting more creative with photo line art drawing, manipulation, and turning any image.
This editing skill helps you to make any image look like a hand-drawn pencil sketch without anybody realizing it. Besides, it is fun! But to do this, you should know how to convert a picture into a line drawing in Photoshop. This guide will teach you how to convert a photo into a line art drawing in Photoshop.
If you do not have much idea, the following tutorial will aid you to make realistic drawings and learn How To Convert A Photo to Line Art Drawing in Photoshop 2023
.
What Is Line Art Drawing?
Line drawing is called pencil drawing. In Photoshop, a line drawing is similar. You draw lines but with curves and make various shapes. The main difference among pencil sketching and Photoshop outline drawings is that one is done by hand, and the other merely involves manipulations.
You do not have to draw in a Photoshop line art drawing by hand. You can convert images to outline art in Photoshop 2023 and make them look as realistic as a pencil drawing. The subjects of such line drawings generally do not contain any color or shadow effect.
Line drawings could be of people’s faces or full-body images, animals, products, or other objects. While sometimes, people convert images to sketch for fun, while others do it professionally as commissioned work.
Turning An Image Into A Line Art Drawing
Adjustment of Photo Contrast
Setting up of Work Layer
Grayscale Image Conversion through Adjustment Layer
Conversion into Line Drawing
Setting up of the Background and Foreground Colors of Images
Pencil Shading
Cross-Hatching Effect
Final Modifications
Before we start this tutorial, you would be taught how to outline an image with the help of Photoshop.
To accomplish this, you must appropriately prepare your photo before applying any filter, so you must dive into this tutorial. The purpose of this tutorial is to work like a professional even your first time trying.
It is common knowledge that all images are not the same, so you need to adjust layer opacity, filters. Image blurs might arise when Photoshop converts an image into a line drawing. As mentioned above, this step-by-step approach will help you convert photos flawlessly.
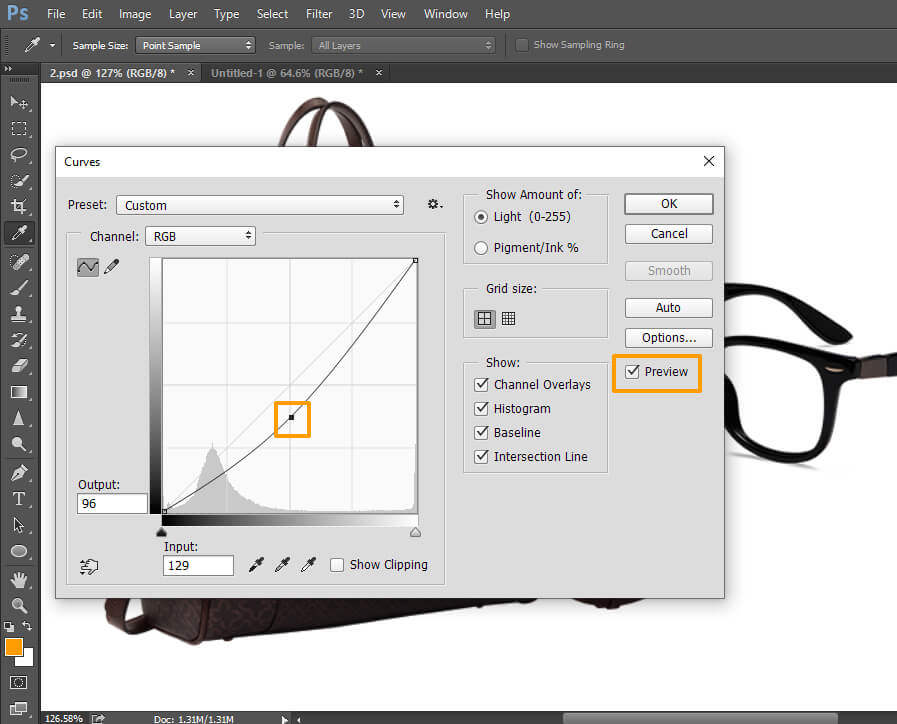
Photo Contrast Adjustment

In the first step, we must select the image we want to edit and insert it in the Photoshop dashboard. To insert your image go to the File menu and click on the Open option, and a window will emerge. Find your image, choose it from the window, and hit the Insert button to open it in Photoshop. You can use a shortcut to drag the image and drop it on the artboard of Photoshop.
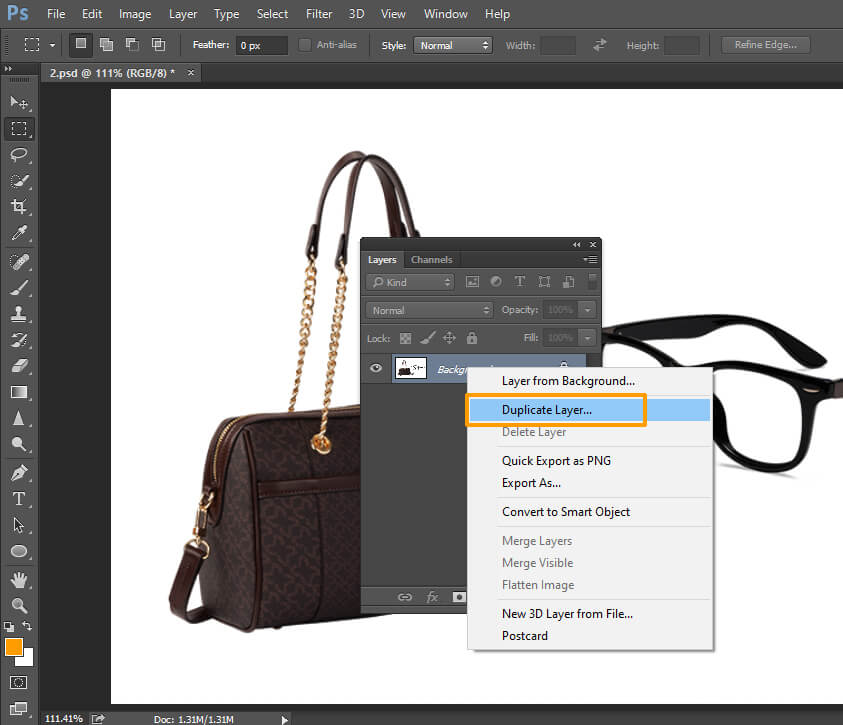
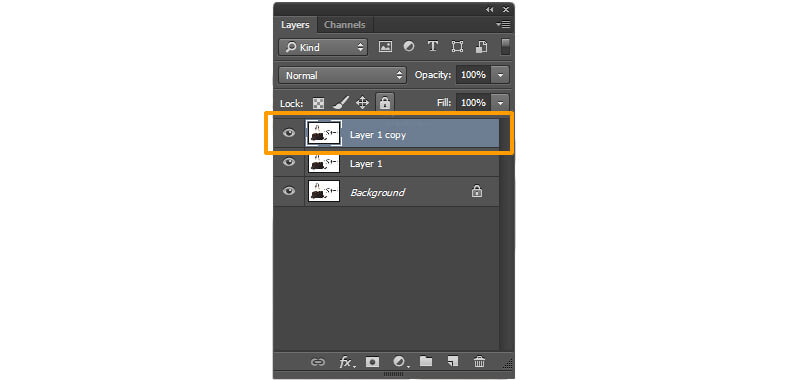
Setting up of Work Layer
After inserting the image, the first thing that we must do is generate duplicate layers to avoid any issue whatsoever. In this tutorial, we will use three duplicate layers, which we will create in a while. To generate the duplicate layers, go to layer plus click on the Duplicate Layer. Repeat the method twice to make three duplicate layers.
Grayscale Image Conversion through Adjustment Layer
Now we will choose the top layer to turn the photo into a line drawing. Go to the Adjustment Layers; we will find it right at the bottom side of the layer panel. After clicking on the adjustment layer, a window will pop up, and from there, we will choose the Hue/Saturation option.
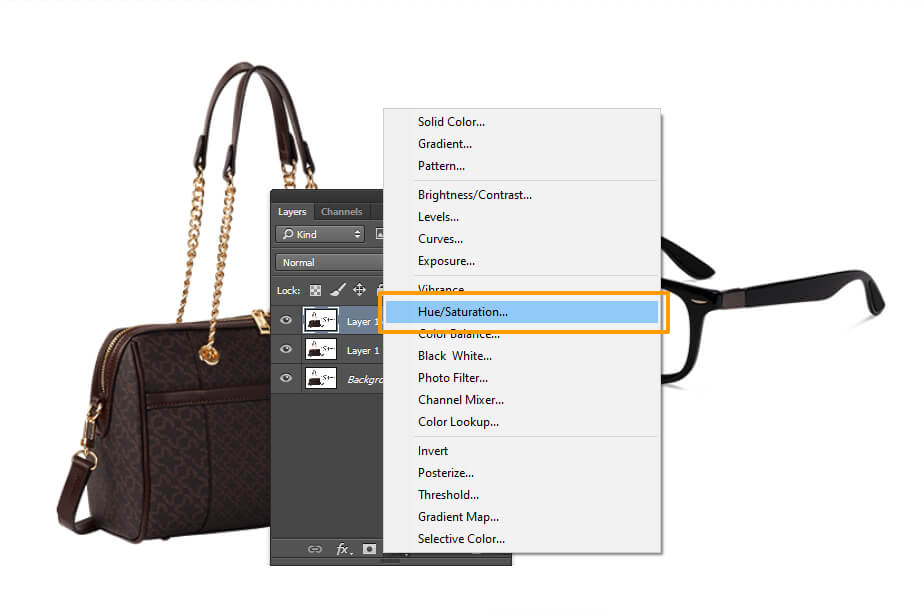
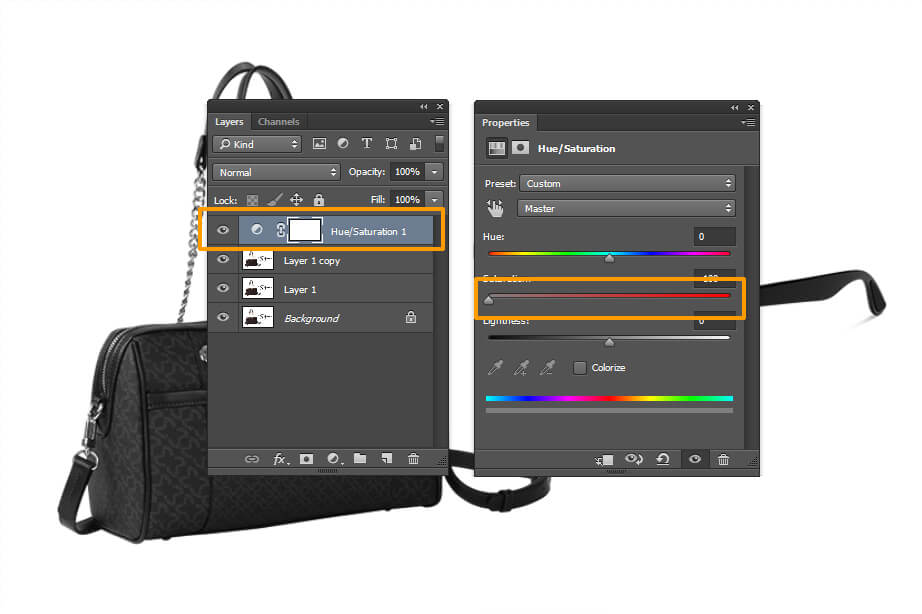
As we have selected the hue and saturation for the top layer, every layer below will also get the changes. Now go to the Properties option, where you will locate three sliders called Hue, Saturation, and Lightness.
We will change the Saturation slider and make it -100. Now our image will look like grayscale, and we will go to the next step after that.
You can turn your image into grayscale mode by using the image menu on the top. Go to image> Mode > Grayscale, and the image will turn into grayscale-like magic.
Conversion into Line Drawing
We will outline our image to turn the photo drawing into a line drawing. Learning how to generate an outline of an image in Photoshop will help you in other photo editing tasks. And if you only want to create an outline of your image, you can discontinue this tutorial after this step.
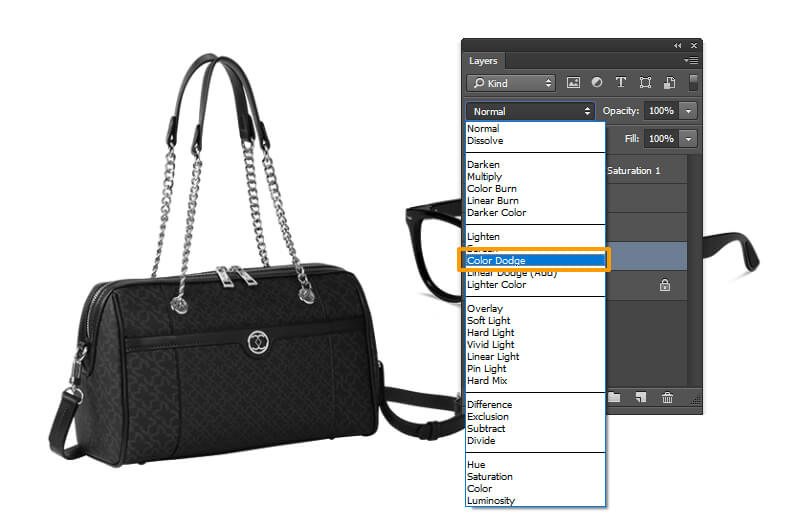
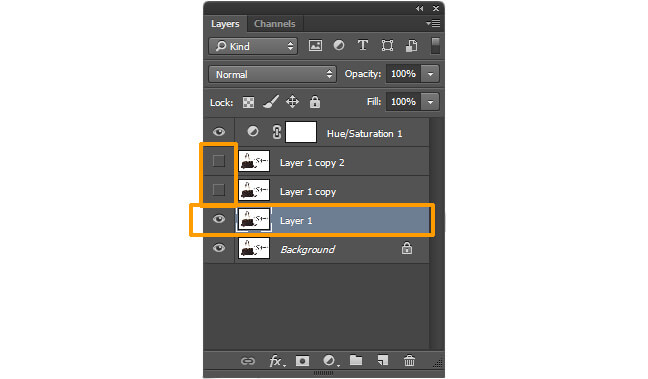
From our three duplicate layers in this step, we will use the first duplicate layer and make invisible the other two. To conceal the layer, you only need to click on the eye icon on the left side of your layers. After making the upper two layers invisible, click on the remaining duplicate layer, plus change the settings from Normal to Color Dodge.
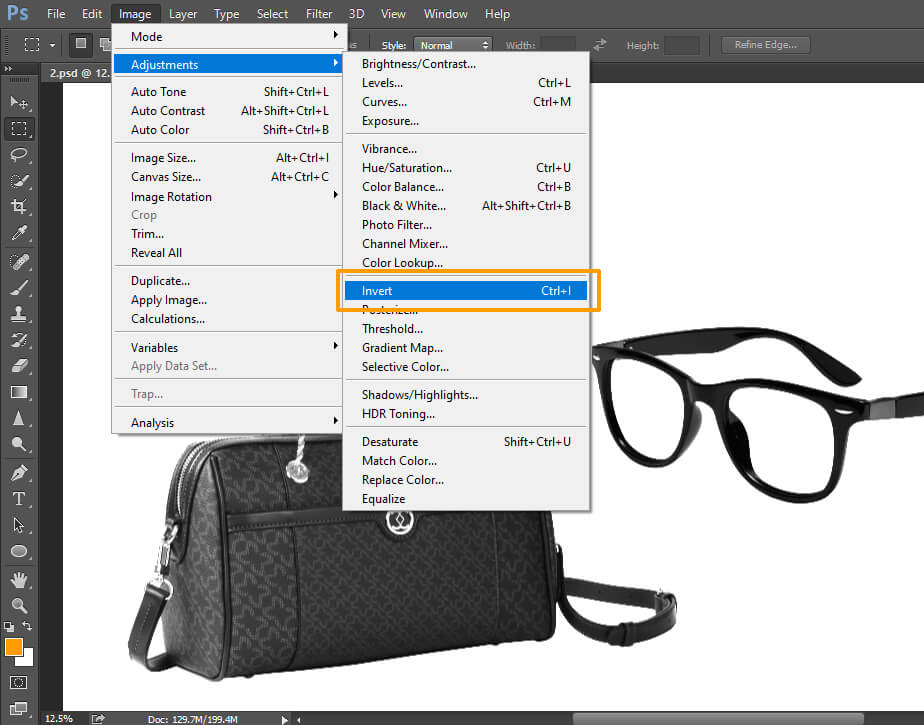
Now we will invert every change we have made till now, and to do that, you can directly press Ctrl+I or go to image> Adjustments, then select the Invert option.
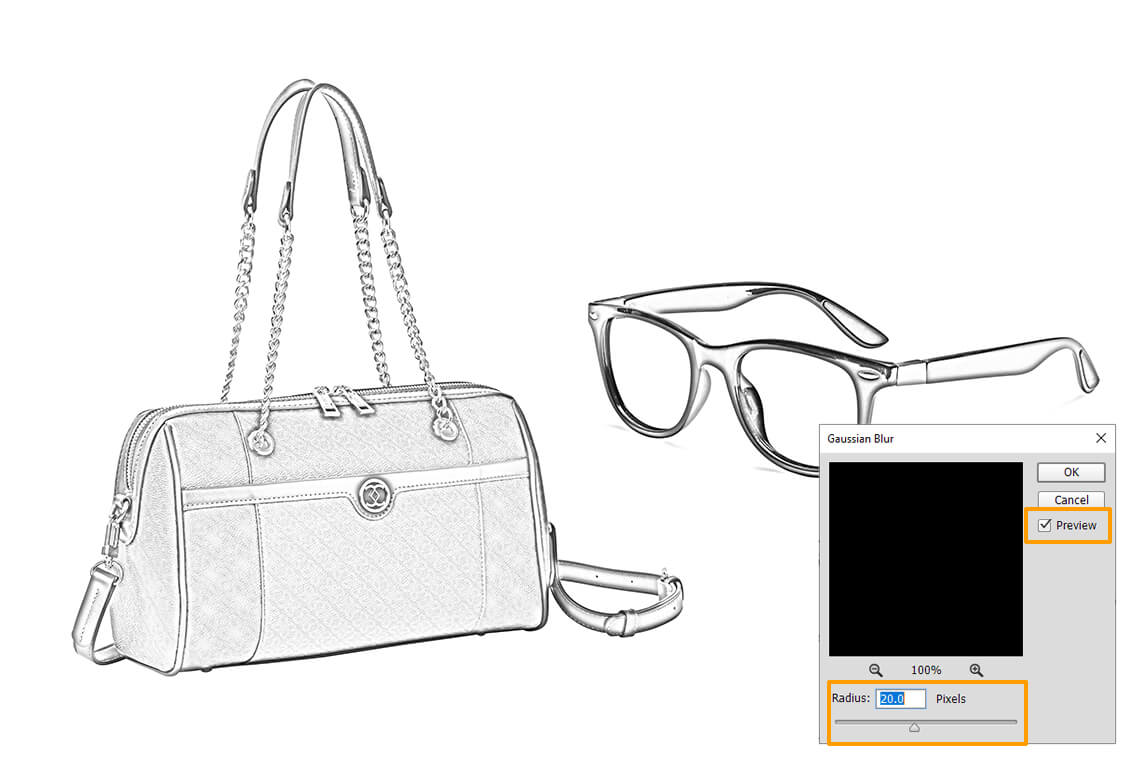
It is time to choose the Gaussian Blur, and to do that, you can select Filter> Blur and then click on the Gaussian Blur option from the menu bar.
A window with the settings of the Gaussian blur will pop up, and from there, first, make sure that the preview option is enabled. In the window, you will see a slider called Radius. Change the slider until you see your image gets the line drawings effects.
How to create the strokes of your line art drawing thicker in Photoshop
We require using stroke settings in Photoshop to make the line drawing thicker. We must generate another duplicate layer from the original to turn the photo into a line drawing thicker. Drag the layer up and take it above our first same layer because we have selected color dodge blend mode for this layer.
Now click on Filter> Filter Gallery, and from there, select glowing edges from under the Stylize option. Play with the Edge Brightness as this slider helps to get a cleaner edge and press OK.

Now invert our changes again by pressing Ctrl+I and use Multiply as this layer’s blend mode. Our line drawing will be thicker than before after this step.
Setting up of the Background & Foreground Colors of Images
In this step, we will alter the background and foreground color from the left toolbar. Double-click the icon to change the color, and a Color Picker window will pop up. From there, you can select any color you want.
Using the color picker window, we will set the background color to white and the foreground color to light grey. To alter both fields’ colors, we have to double-click on both fields individually. It means when you change the background color, double-click the background icon plus from the color picker window, take the selector to the upper left-hand corner, and hit the OK button.
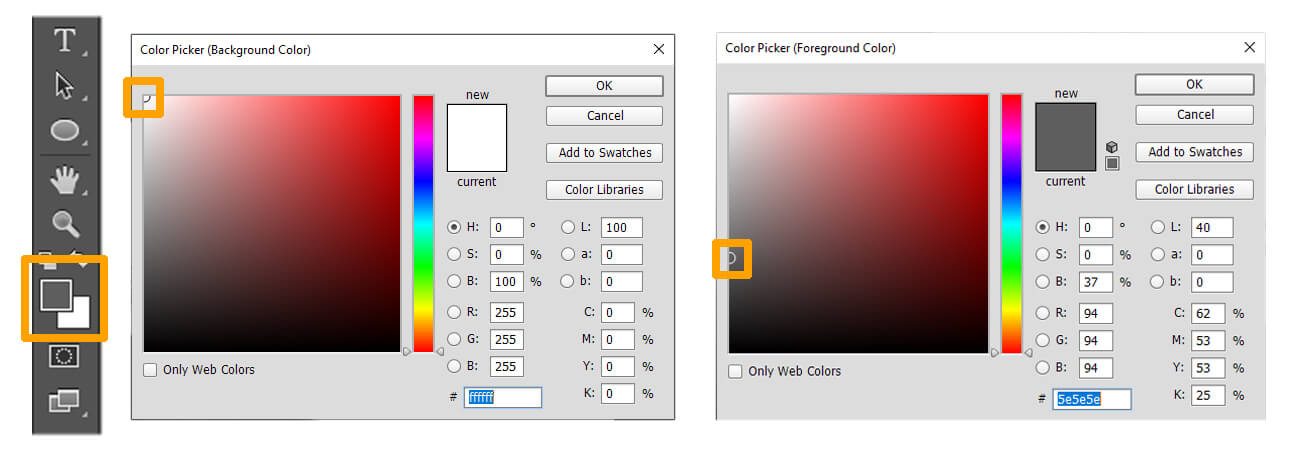
The same goes for the foreground color, which is a double click on the icon, and from the color picker window, take the color selector midway down the left side and hit the OK button to confirm.
Pencil Shading
We will choose the layer above the current layer we were working on for this segment, but as we turned off the eye button of this layer, this layer is now in hidden mode. Click the eye button to turn the layer on and make it visible.
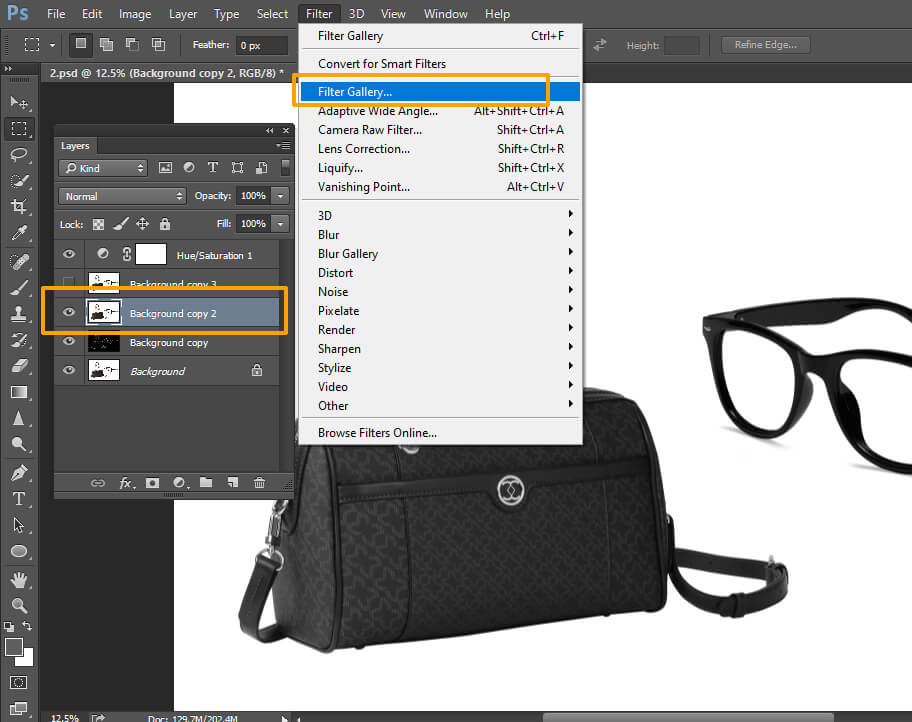
You must use the filter gallery to add pencil shading to the photo. Go and click on Filter from the top menu bar. Choose the Filter Gallery from the drop-down menu.
From the Filter, the gallery selects the Sketch folder plus then clicks on the Charcoal filter to provide your image with the pencil shading.
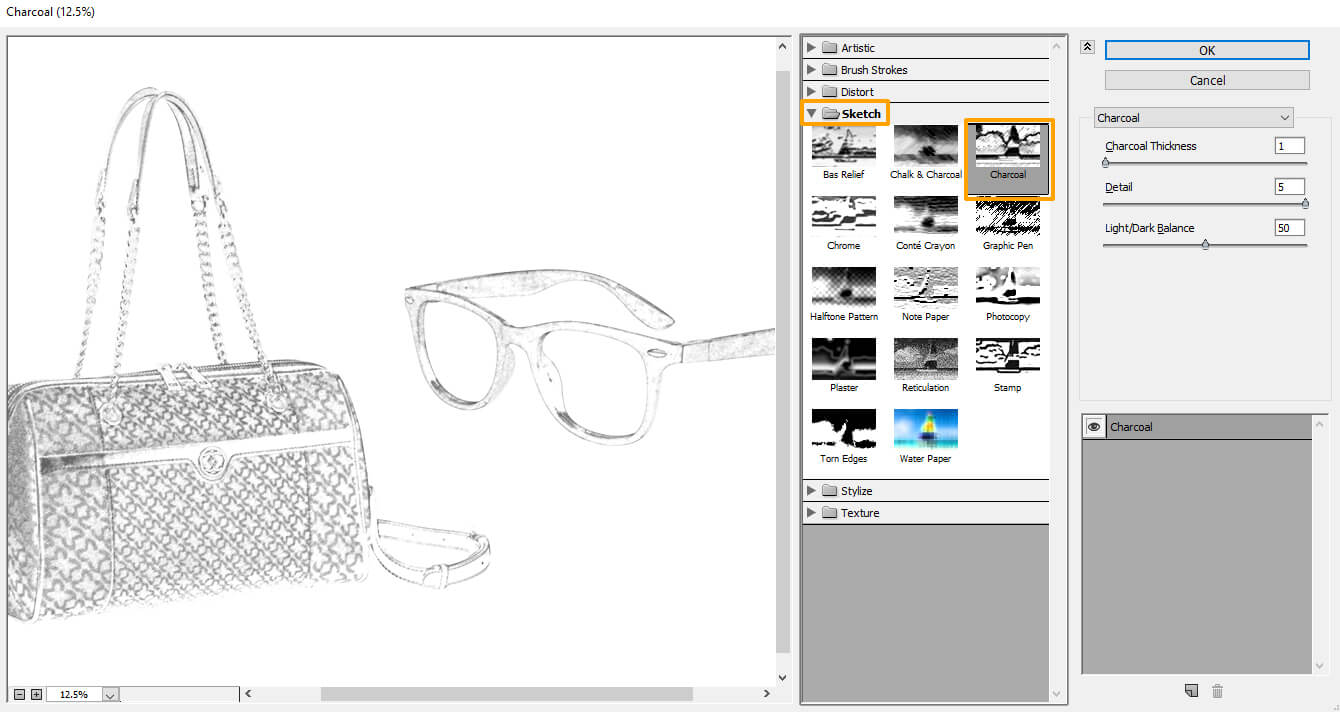
Set the Charcoal Thickness, Detail, and Light/Dark Balance sliders per your requirements. When you find the perfect spot for the sliders, hit the OK button to confirm the changes.
The last part of this stage is to alter the blend mode of the layer we are working on from Normal to Multiply.

Cross-Hatching Effect
We will add a cross-hatching effect to our picture, so we must go to the Filter Gallery again. Click on the Filter option from the menu bar and choose the Filter Gallery option from the drop-down menu.
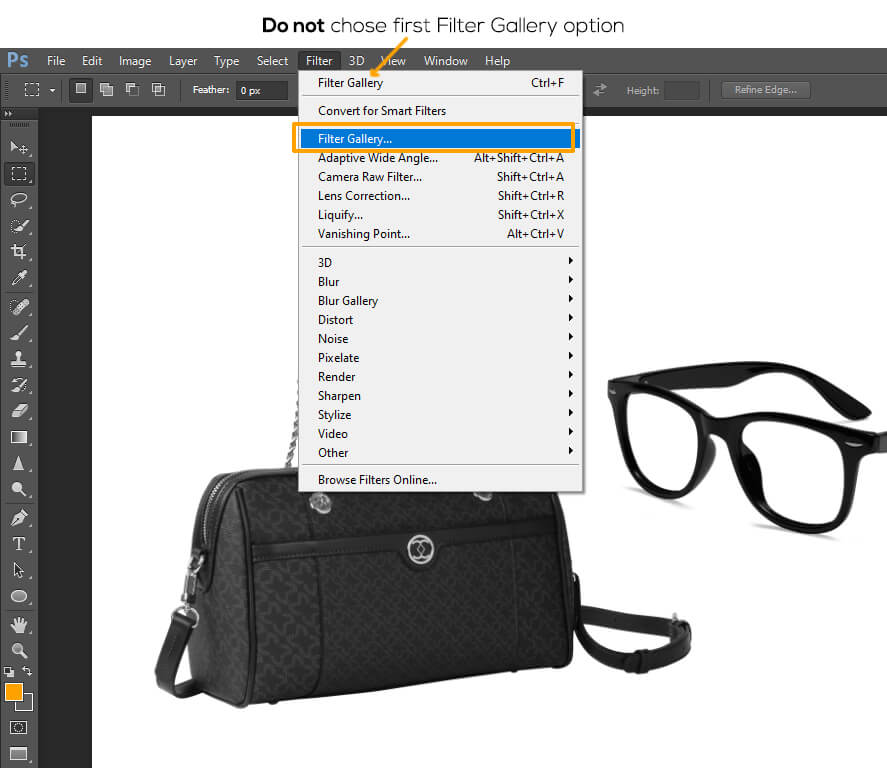
As we formerly used the filter gallery option, you might see two in the Filter drop-down menu. Choose the second option this time.
Choose the Sketch folder from the Filter Gallery window again and click the Torn Edge filter. Adjust the Filter sliders on the right side until you get the desired effect.
Final Modifications
Adjust the sliders for the Graphic Pen.
Staying in the Torn Edge settings, see at the bottom right-hand side. You will see a corner folded paper icon called New. Click on the icon, plus you will get two Torn Edge names on the right-hand side.
The bottom one will have another partner, Graphic Pen, among the two Torn Edge. Keep choosing the first Torn Edge filter, then select it from the bottom two clicks on the Graphic Pen.
Now use the graphic pen slider to make changes until you are pleased, and before changing the slider, choose the Stroke Diagonal to Left Diagonal. Hit the OK button to confirm the change you made.
Change the Layer Blend Mode
Alter the Layer Blend Mode from Normal to Multiply for this layer like the preceding one. You can play with the settings and practice when you are free to learn the operations of these tools.
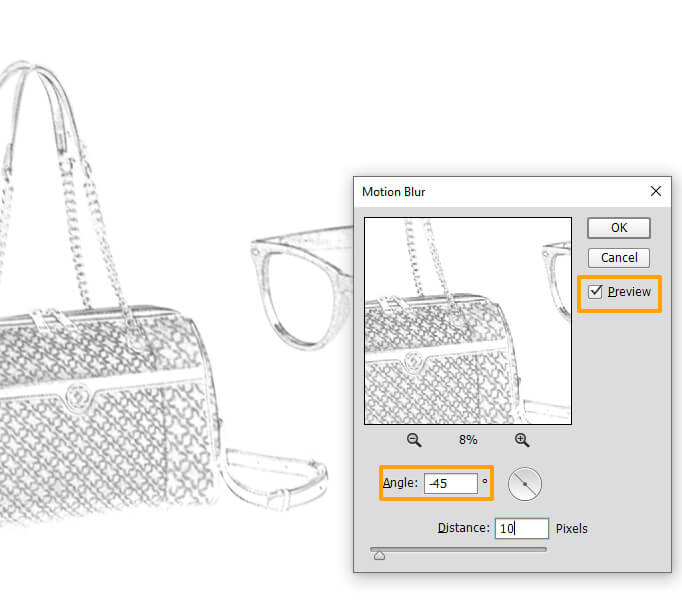
Add Motion Blur to turn the photo into a line drawing.
We will add motion blur to the layer we have just worked on. To add the motion blur to our layer, go to Filter> Blur and choose the Motion Blur option.
A dialogue box will pop up when you choose the motion blur option. From there, set the Opacity and adjust the Distance slider per your requirements. When you are done, hit the OK button.
Check the preview box to see the changes in real-time.
Adjust the Opacity of layers of the image.
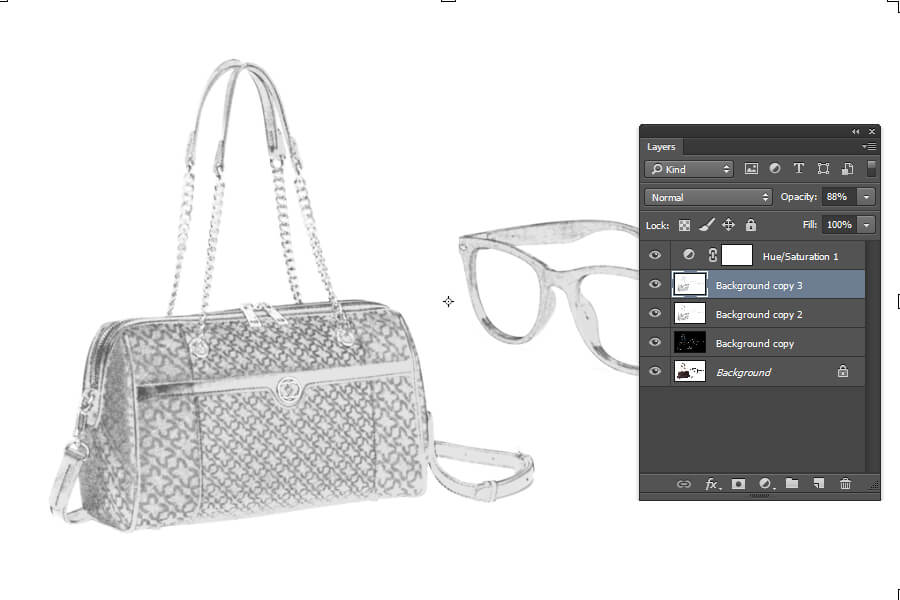
If the result feels satisfying, you can skip this step. But if it did not, then the cause must be the high pencil shading intensity. To decrease it, adjust the Opacity of the stamped layers. Keep the Opacity of the bottom two layers intact, or the line drawing will decrease along with the Opacity.
Clean up any artifacts to turn the photo into a line drawing.
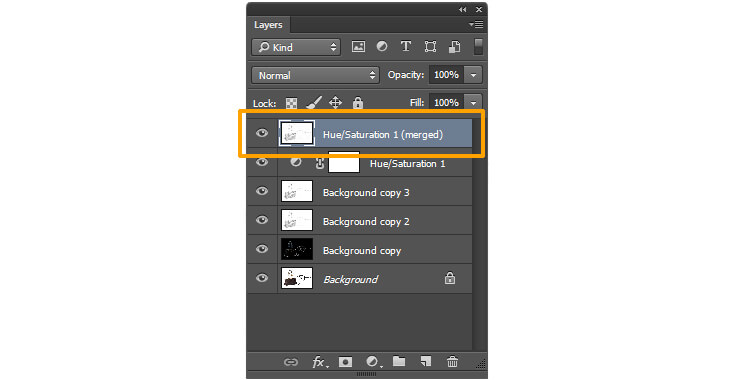
Lastly, cleaning up the artifacts can bring the perfect perfection you were looking for from the start. To eliminate any dark spots and dust, merge all the layers into one by pressing Ctrl+A+E. This layer is also called the stamped layer.
Set the background color to white and choose the brush tool from the left toolbar. Paint over the spots plus smudges to eliminate them in Photoshop.
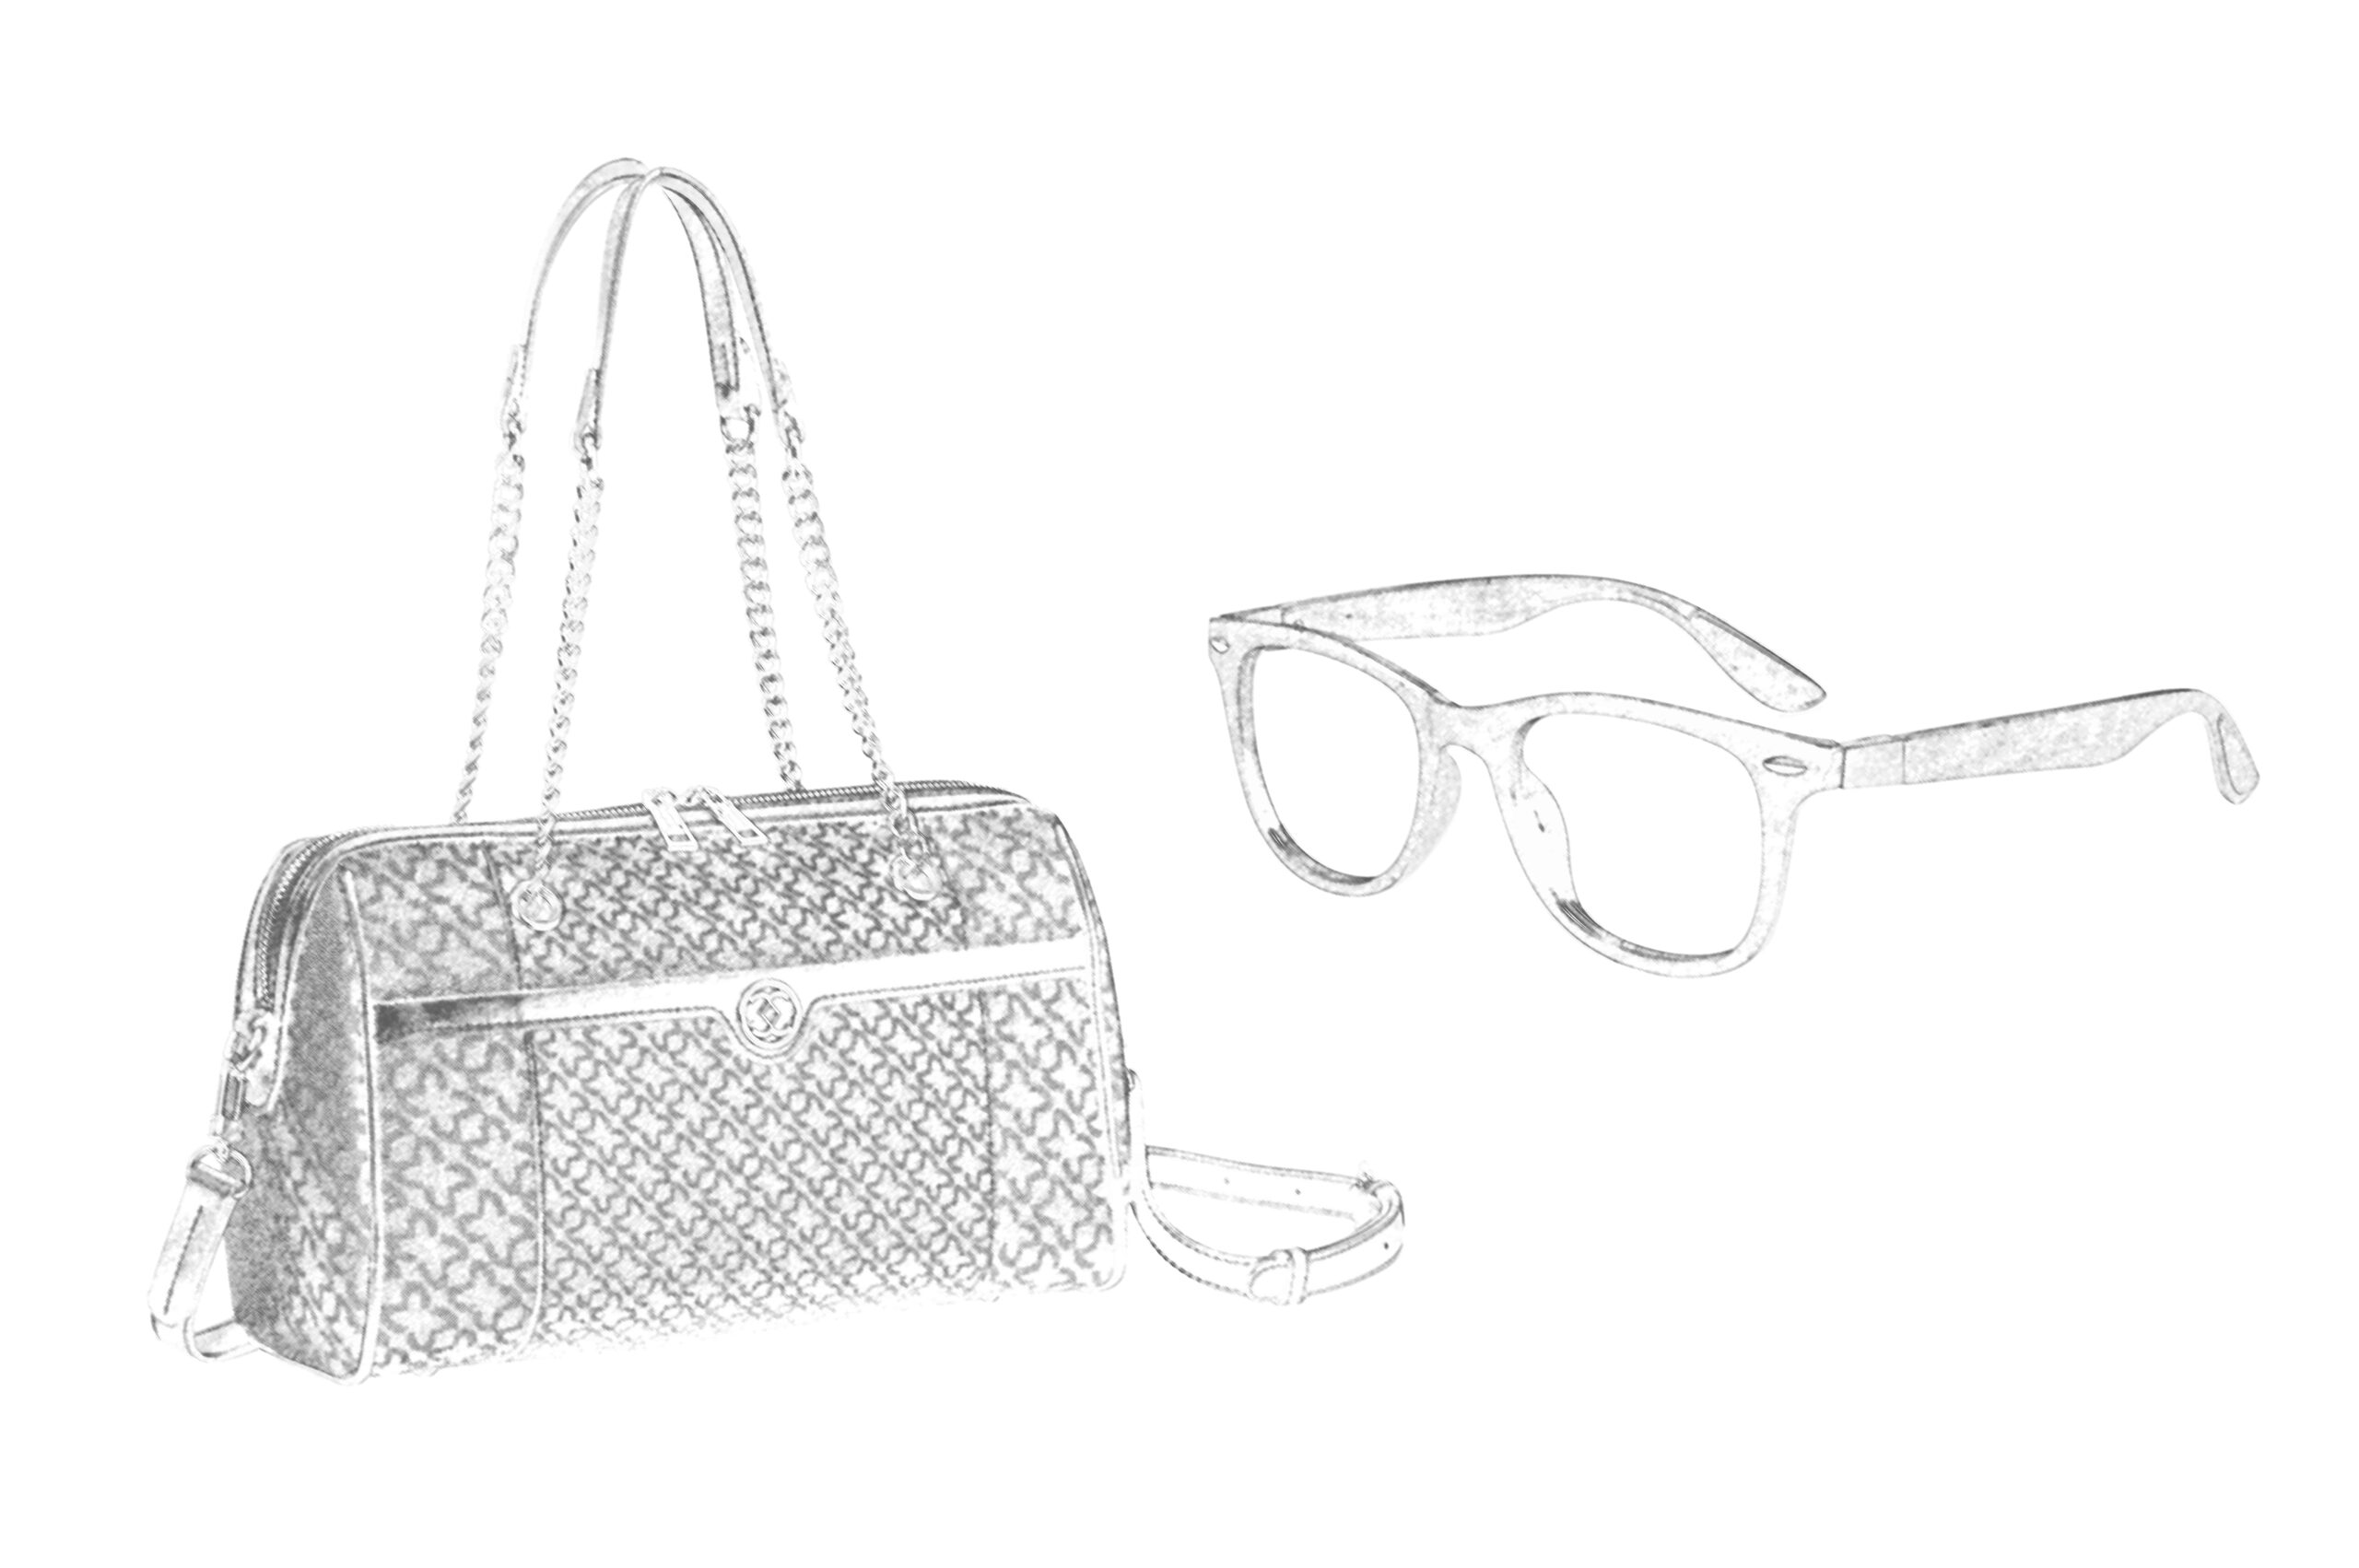
By doing this, you successfully convert images to line art online and are ready to use it on online platforms.
Purpose of use to turn the photo into a line art drawing.
Before you turn a photo into a line drawing, you must know the purpose of its use. Line drawing a picture will give a pencil a sketch-like look, and these images can offer a premium artistic vibe.
A line art image can improve your brand’s reputation if you use it correctly. People love to watch exclusive photos, so they will appreciate this new idea. So retailers and photographers can take on this unique idea without any doubt. Turning a photograph into a line drawing should not be any surprise for personal use owing to its benefits. It enhances the style of your image and attracts more eyes than ever.
Conclusion
Turning a photo into a sketch is more accessible than some think. By following the proper process and being patient, you can efficiently perform this job quickly. Patience and attention to detail are recommended while converting a photo into a line drawing or sketch. You can always get the best photo-editing assistance from a reputable company like Clipping Path Mania.